This article does not go into the details of building the amplifier circuit. For a tutorial on this, see A Simple Amplifier.
I have been working on bicycle stereos for a number of years. Unfortunately, these days very few people take the time to enjoy cycling. Fewer still consider designing sound systems for these wonderful vehicles, although this is perhaps understandable. Bicycles endure incredible impact, shock, vibration and weather, and can't handle very much weight before becoming unusable. Any system designed to mount on a bicycle must be designed to handle these conditions.
Searching the Internet will find a few different designs for stereo bikes, but at the time of this writing, these designs are all lacking. Many stop working or break in the rain; some are heavy, unwieldy or catch wind; most aren't very loud and none of them are particularly aesthetic. My goal is to avoid all of these problems. I haven't quite succeeded, but I'd like to think I'm close.
The first stereo bike I ever built was simple: a single speaker zapped to the frame, connected to an iPod through a 3.5mm cable. This isn't a new idea; I'm sure you or someone you know has tried this at some point in their life, and stopped because there's some major problems with it.
Firstly, iPods suck. They break easy and more importantly, their firmware is buggy, encrypted, slow and barely functional. Their circuitry is weak and fragile. I now use a Cowon D2, and have worked a little with their new model, the S9, and have never looked back.
Secondly, this is a huge strain on your MP3 player's internal amp. The D2 can handle it, but on anything else, the sound will be unreasonably quiet, and over time the amp will burn out and die, and then you need a new player. This killed my second iPod after about six weeks.
Finally, this was a very weak design. Not only do you have to keep the player in your pocket and run wires from the bike into your clothes (this has nearly wiped me out a few times), but the speaker would break off easily on the smallest of jumps. Originally, I used a 6x9" component speaker, which was very heavy, and the sharp metal parts would cut through the zaps.
We've seen that attaching an MP3 player directly to speakers is not an option, it's clear that we need an amplifier. Given that we've got an amp, we definitely need a power supply, and we probably want two speakers as well. As it turns out, this design solves a lot of problems.
The amplifier is very light. This means that it cannot possibly come off of the bike, no matter what happens. Once I was in an accident that warped my front wheel and nearly broke my arm; the stereo continued to play throughout the entire incident, even though the bike no longer worked. Also, it doesn't move, which lets you run wires up the frame and zap them in place without worrying about excessive stress.
Using two speakers instead of one also lets you reduce the weight. I am using a pair of 3.5" tweeters right now, and it sounds fine given the low-power 50-60W operation. They are simply zapped onto the handlebars and are very secure. (I am researching adding bass circuitry and a sub, but I haven't gotten anywhere.)
At this point we have split the bike stereo into four main components:
My stereo bike mounts these in the following configuraion:
I've tried a number of methods of mounting the amp to the bike - initially, I had an exposed board zapped to the frame, allowing air flow to cool the circuit as I rode. This worked for a while, but would usually start clipping and then shut down after about half an hour. Air cooling does not work for the TDA1554Q. Also, it looked horrible and was exposed to the rain.
So, I picked up a metal project case from my local SMI and mounted the amp circuit inside. Make sure the case is big enough to comfortably fit the chip, wiring and connectors! The easiest thing to do is to drill two holes in the lid of the case and bolt it to the bike frame in place of a cupholder. Make sure the holes are offset so that by screwing/unscrewing one side of the case, you can remove the amp.
[pictures to come]Now, make sure there are holes at the bottom of the case to allow water to drain. With these holes in place, the amplifier should never fail due to rain (at least, not before your MP3 or speakers do!), but without them, the case can fill with water through the jacks and destroy the circuit.
Also, you might need to work on your ground connections - because the amp gets jostled around, it's possible that some connectors will ground to the chassis when they shouldn't, or vice versa. If the stereo is cutting out when you hit bumps, this is one of the first things to check.
The second-most difficult component to mount was the power supply - being cheap, I have used a 4.5Ah lead-acid battery since the beginning. I find using a 4.5Ah battery gives the best compromise between power and weight. However, even this small battery is very dense and broke out of several different mounting systems I devised. After dozens of tests and lengthly conversations with friends and strangers, I decided to build an acrylic case. Living in the Lower Mainland, I visited my local Industrial Paint & Plastics and bought some small plexiglass panels custom-cut to fit the battery.
IPP would have gladly made the whole box for me, but at the time I didn't expect acrylic to withstand the kind of impact I was expecting. So I opted to weld the panels together myself, figuring I'd be doing a lot of roadside repairs anyway. As it turned out, plexiglass was definitely the right answer. I wouldn't go recommend mountain biking or stunting with it, but I have, and it's kept on working almost two years later. If you plan on playing rough, try working with polycarbonate instead of acrylic. It's faaar more difficult to work with, but simply will not break. (After starting this project, I had the priviledge of working for IPP for a short time one summer; I can say with all honesty that they are very good at what they do.) (Me, not so much. ;))
Anyway, the plexiglass battery case was built to be installed where the cupholder normally is. This image hopefully will explain what I mean:
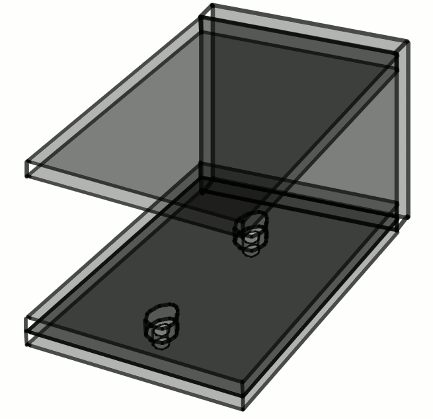
The actual model has side panels as well, but drawing them in made the image very difficult to read. All panels are 1/4" acrylic. I haven't included dimensions because I got mine by measuring my battery, and you likely will not get the same result.
The battery cable should have crimp connectors on one end, and an appropriate DC jack on the other. (Center pin is power, outside ring is ground.)
Simple. Put velcro patches on my MP3 player, and opposite patches on the right shifter of the bike. You won't be able to see what gear you are in anymore, but this is something you get used to pretty quickly. I ran a male-male 3.5mm aux cable from the amp case to the MP3 player, zapped to the bike at the center post. Make sure there is enough slack for the handlebars to turn comfortably, but not so much that the cable tangles in the spokes or tire!
This is listed last for a reason: mounting speakers on a bicycle is incredibly difficult, and I have still not worked out an optimal design. However, don't dispair! Even with a crappy speaker setup, my stereo bike has functioned loudly and clearly for almost 2 years now. So bear with me.
There are four things to worry about when mounting speakers:
Another potential issue is theft. If anything is going to get stolen, it'll be the speakers. But I have never had a problem with this.
So, given all that, what should we do? Well the first and easiest issue to deal with is finding lightweight speakers. I bought a pair of 2.5" speakers from my local Futile Shop, which was a bit of an adventure since the saleman and I had been out until 4AM the previous morning, so neither of us had slept. They came to just over $100, which was more than the rest of the stereo combined, and I never saw him again. C'est la vie, I suppose.
Now, there is no such thing as full-range 2.5" speakers - certainly not ones I could put 50 watts into and still hear! So I lose a fair bit of bass, which is sad but I think a reasonable trade-off. Overall the sound quality is very good, and with traffic in the background, you don't really notice the lost bass anyway.
Light speakers are also easy to mount. They're held onto the handlebars via zapstraps and they don't break under normal use. However, they do break when doing big jumps, so if anybody has a better idea, please email me. Zaps can be tightened quite a bit and I think the speakers are tight enough to the bike that I'm not losing much volume. At traffic lights I can feel the bass shaking the entire bike, which is pretty impressive for a 50 watt amplifier sounding through 2.5" tweeters!
As for weather, I dunno. I ride my bike in the rain and the speakers basically just deal with it. The plasticky cone material can handle a fair bit of rainwater, as well as dew, mud splatters and spilt coffee. I've never taken it out in a downpour, since generally the MP3 player becomes hard to use when the touchscreen is even a little bit wet.
Anyway, here is the bike:
Pictures to come.December 2009
Andrew Poelstra